

I originally found the recipe for this Maple-glazed Roast Chicken with Sesame Seeds in Delicious Magazine a while back and have prepared it quite a few times ever since and have tweaked it a bit. It turns out deliciously juicy every time and, if you keep the cupboard ingredients at home like we do now, it's just a matter of buying the best chicken you can afford. This is really simple and after a while you will adapt it to your taste and remember it by heart. It looks lengthy but that's only because I've embellished as well as added my tweaks, otherwise I could have just sent you to the Delicious Magazine website, couldn't I?
Maple-Glazed Roast Chicken with Sesame Seeds
Ingredients
- 1.5 kg chicken (preferably free-range). If your chicken is bigger, just increase the below amounts and the cookign time accordingly (i.e. a little bit). For example for a 2.25 kg chicken you will need about 2 hours.
- Unsalted butter cut in slices then cut again to turn it into strips, about 25g should do it
- 5 tablespoons red wine vinegar
- 4 tablespoons maple syrup
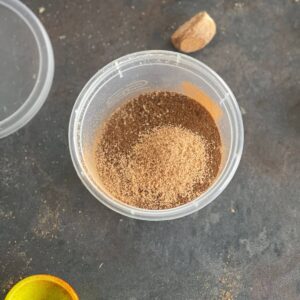
- 1 teaspoon cinnamon
- 1 tablespoon sesame seeds
- A brush for the glaze
- Salt and pepper to season (although the result is so tasty that it's not even necessary)
Right, you have all your ingredients at home, ready? These are the steps to follow.
Method
1. Preheat the oven to 200°C/gas 6. If you have a rubbish oven like we used to have, adjust this to whatever you're used to to achieve that temperature, if you have a fan oven 180ºC will do the trick.
 |
| Chicken buttered, vinegared and seasoned ready to go in the oven |
2. As soon as you've turned/pressed whatever gets your oven going, get the chicken out of the fridge, it's better if it isn't totally cold.
3. Place on a roasting tin. Insert the butter strips between the breast skin and the breast itself, if you're squeamish get someone else to do it for you or just think of me stressing to you with a Spanish accent that it is well worth it. Then pour 2 tablespoons of red wine vinegar in the cavity (nowadays I just do this calculating roughly as I tend to lose the measuring spoons easily, it doesn't matter if you don't get it exactly right). Season (I don't always season it) and into the oven it goes, middle shelf preferably (then again this depends on your oven).
4. Set your timer for 1 hour and 10 minutes, adjusting it to the weight of your chicken. You can prepare the glaze now or 5 minutes before the alarm goes off, either way it's time to put your feet up, let someone else do the side dishes*.
5. In a bowl mix 3 tablespoons of red wine vinegar, 4 tablespoons of maple syrup, 1 teaspoon of cinnamon and 1 tablespoon of sesame seeds. Give it a good stir as the cinnamon tends to not want to mix too easily.

6. As soon as that little nifty timer goes off, it's time to get hold of the brush and get crafty by spreading half the mixture all over the chicken. Make sure you get into every nook and crannie, I even get a bit of the mix in the cavity. Back into the oven for 10 minutes, then spread the rest of the mixture and back in for another 10 minutes.

7. Ring ring (or in my case Marimba Marimba) goes the alarm. Time to get that fabulous chicken out of the oven, place it with pride wherever you can find some space and let it rest for 5-10 minutes.

8. (Optional) If you fancy some lovely gravy, my husband tends to take over with it and boil the juices left in the roasting tin rapidly with some white wine while stirring (or rather getting me to stir), the result is a delicious gravy.
Final step: Get everyone at the table and enjoy every mouthful in good company.
*Don't forget: "Serve with Spanish flair", in this house we also serve it with my husband's amazing roast potatoes, vegetables such as carrots, broccoli,... usually steamed and drizzled with a bit of good extravirgin olive oil. Finally, something that I love about British gastronomy: bread sauce.
Tip: You won't always be able to get a chicken that weighs exactly 1.5 kg, also you may have more people to feed sometimes, just increase the amounts as you see fit.
Another tip: I sometimes increase the maple and cinnamon amounts.
Third tip (bear with me, I'm on a roll): If you're going to do roast potatoes, we have come to the conclusion that the best way is to start parboiling them once step 3 is done with. That way they are ready more or less at the same time as the chicken.
Roast chicken makes for fantastic leftovers, in weeks to come I will share with you how we make the most of it for a couple of days.

Nicola Thomas says
Looks amazing! I will let you know how I get in with it and thank you for blogging it x
Leigh Powell Hines says
That looks fantastic. Yum!
Jen says
This looks delicious!
Diane Balch says
Put maple syrup on it and I am sold. Looks delicious.
Maria @ Feisty Tapas says
It is Leigh and so easy to prepare, it also makes wonderful leftovers, as roast chicken does.
Maria @ Feisty Tapas says
I fully recommend Jen (obviously), it's really tasty.
Maria @ Feisty Tapas says
It is! Let me know if you try Diane.
Patricia says
I have everything to make this so I'm going to try it- thanks for posting- it looks amazing!